
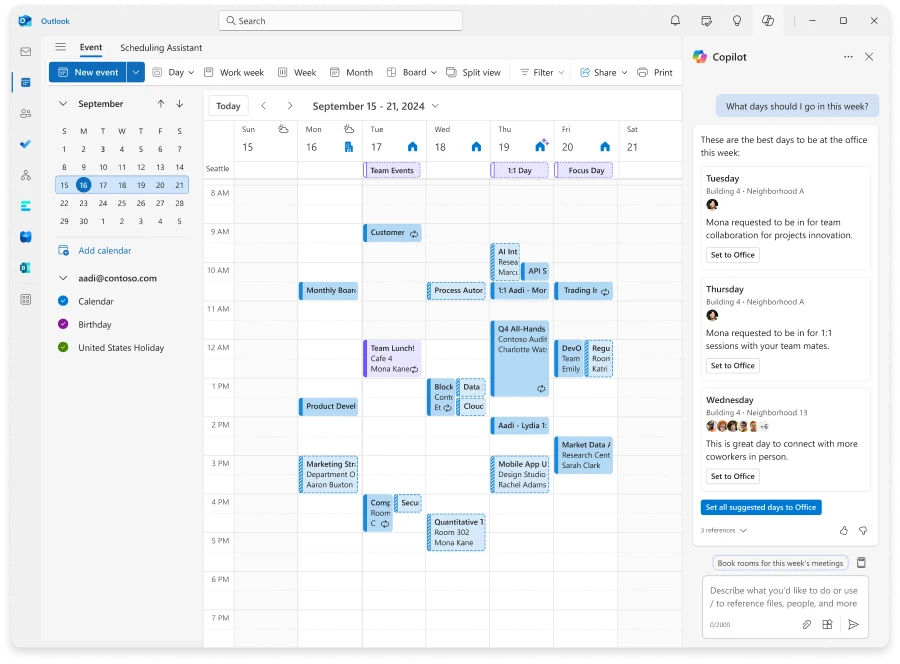
The way we work has changed. Flexible work has become the new norm, and organisations everywhere are rethinking how they use their office spaces. That’s where Microsoft Places comes in. It’s a smart, AI-powered solution designed to help you manage bookable spaces like desks, conference rooms, and shared areas, while making it easier for employees to connect and collaborate in a hybrid work environment.
Microsoft Places works with the tools you already know, like Microsoft Teams and Outlook. It helps employees plan their in-office days, book the right spaces, and even see who else will be in the office to maximise collaboration. Managers get insights to optimise how and where work happens, improving long-term planning and space utilisation.
Like all good things, a smooth rollout of Microsoft Places starts with thoughtful planning. This guide walks you through everything you need to know to get started, from setting up your data structures to creating functional, detailed maps using Mappedin. Let’s get started!
Table of contents:
– Sketching out data structures and parent-child relationships
– Key relationships information
– Setting up resources in Exchange Online
– Guidance on using PowerShell to setup Places
– Creating Maps using Mappedin
– Troubleshooting mismatched spaces in Microsoft Places
– Important considerations for configuring bookable spaces in Microsoft Places
Sketching out data structures and parent-child relationships
Before enabling Places, it’s essential to map out your data structures and define the parent-child relationships for each entity. These relationships are the foundation of smooth functionality, ensuring all resources work as expected.
(The below table reflects the current documentation from the Mappedin Website)
| Microsoft Places Resource | Mappedin Resource | Configuration |
|---|---|---|
| Conference Room – A room that can be booked. | Room – An area surrounded by walls with 1 or more doors. | Mappedin Room Name must match the Conference Room Display Name. |
| Section – A pool of desks with one or more seats that can be booked. | Object – An object that is placed within a space. | Object Name must match the Desk Pool Display Name. |
| Desk – Appear as an option that can be booked in Outlook, but not on the map. | Not applicable since desks are not shown on the map. | Not applicable since desks are not shown on the map. |
| Floor – A level in a building. | Floor – A level in a building. | Places will use the floor name from Mappedin, prefixed with Floor. The Places sort order should match the elevation of the floor in Mappedin. |
| Building – The top level container for floors. | Map – A map containing all elements listed above. | Configured in detail in the Configure Microsoft Places section below. |
Below is a tree showing the relationships between each entity, and below that the relationships I created for my map.
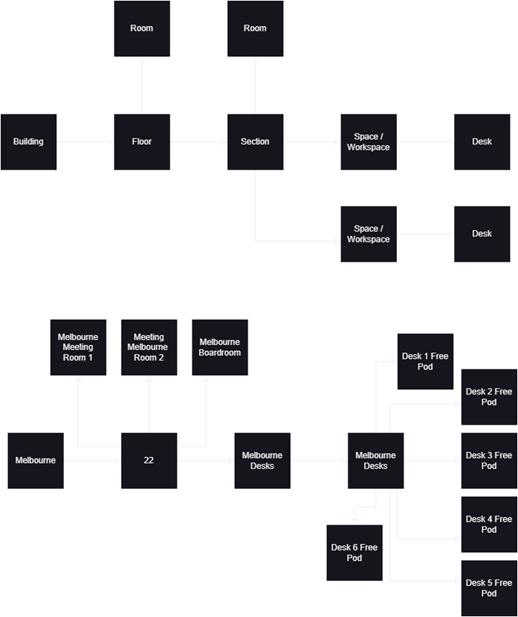
Key relationships to note:
A ‘Workspace’ (ie a desk’) is required to have a parent Section.
A Room is required to either have a parent section, or a parent Floor. Rooms that existed prior to the deployment of Microsoft Places will need to be updated to have an association with one or the other.
All of these may already exist in the tenant, or may need to be created. Additionally, the Sections and Rooms that do not already have a mailbox will require creation a new Mailbox through executing the New-Mailbox command through Exchange Online PowerShell.
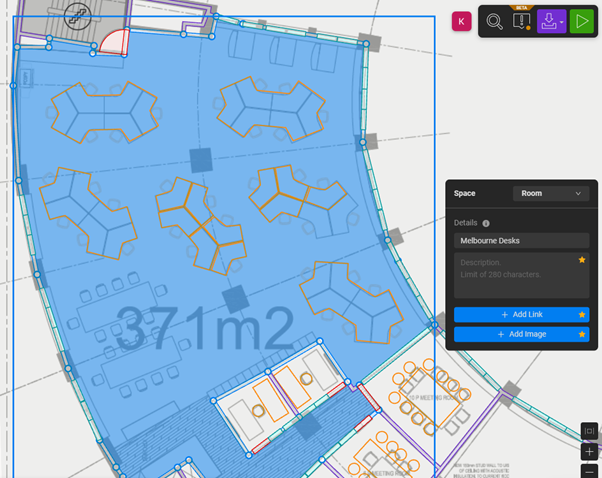
If the map has several areas of desks, then several ‘Sections’ of desks may work. As there is a single room of desks in my example, I’ve named the section the same as the Space. It isn’t clear at present where the ‘Sections’ appear in the tool, but are essential in terms of setting up the parent-child relationships.
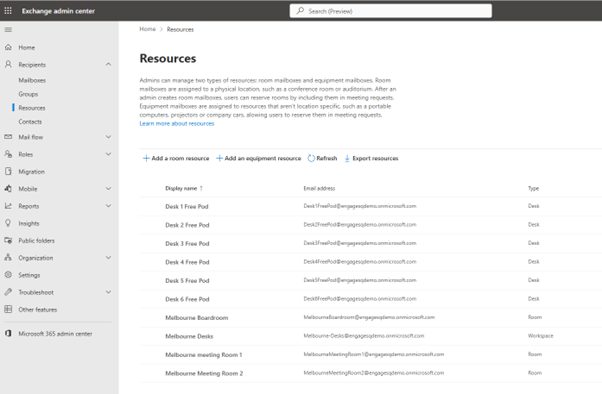
Setting up resources in Exchange Online
Guidance on using PowerShell to setup Places
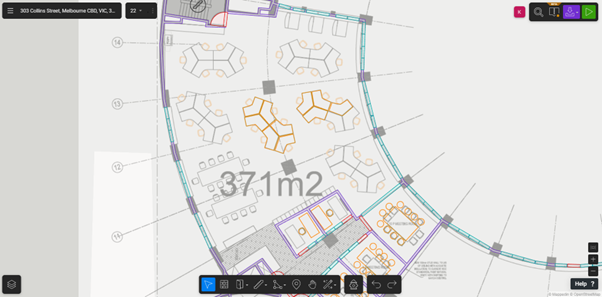
Creating maps using Mappedin
Important considerations for configuring bookable spaces in Microsoft Places
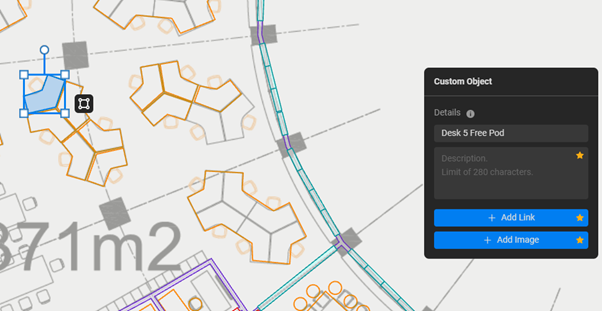
- Each desk requires its own shape:
For individual desks to be bookable, each one must have its own distinct shape on the map. In this setup, I’ve opted to use the shape of the desk itself rather than including the chair. This ensures clarity and consistency for users booking spaces. - All bookable spaces must be enclosed and include a door:
Microsoft Places requires all bookable spaces, such as meeting rooms or offices, to be fully enclosed and feature a door. This can present challenges for offices with open-plan layouts, particularly if AV equipment or shared resources are located in these areas. - Mapping may differ from reality:
Due to these requirements, the map created in Microsoft Places may not perfectly reflect your real-world office layout. You may need to adjust or simplify the map to meet these guidelines while still making it functional and user-friendly.
When the assets have been created, any ‘name’ that is used is needs to mirror the name in the map.
Troubleshooting mismatched spaces in Microsoft Places
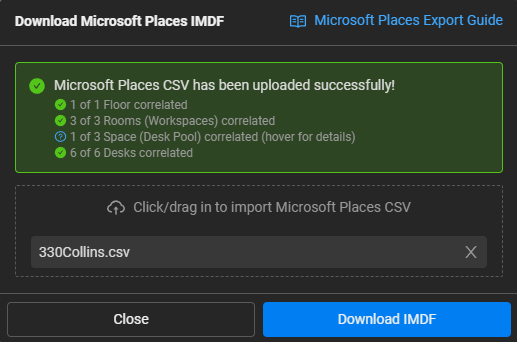
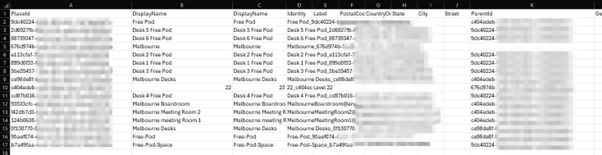
If the spaces you’ve set up aren’t correlating correctly, it’s essential to check the configuration within the CSV file. Follow these steps to ensure everything is aligned:
- Verify name accuracy:
Open the exported CSV file and confirm that the names in the file exactly match the names attached to your labels. Even small discrepancies (like extra spaces or mismatched capitalisation) can cause issues. - Check ParentId alignment:
Ensure that the ParentId values are correctly linked to the appropriate ParentId in your configuration. This is critical for maintaining the hierarchy of your spaces (e.g., desks linked to a floor, or floors linked to a building). - Export your current setup for review:
Use the following PowerShell command to export your Places data into a CSV for review:This command will generate a CSV file containing all relevant details of your Places configuration. Use it to cross-check your names, ParentId values, and other fields to identify and resolve any mismatches.
The object must exist in the tenant, before Mappedin will seek to correlate it to any item on the map. Labelling desks or rooms on the map will not create a navigable item unless it can be correlated before the maps from Mappedin are exported.
Finally, the map can be removed and re-imported if Places assets need to be deleted and recreated, but it may take 24 hours for those changes to flow through to tenant.
Happy mapping!
Like what you see?
At Engage Squared, we’re experts in helping organisations navigate the complexities of hybrid work, including the setup and configuration of tools like Microsoft Places. Whether it’s defining parent-child relationships, creating functional maps with Mappedin, or streamlining bookable resources, our team has the knowledge and experience to guide you every step of the way.
From public sector offices to healthcare, finance, and retail environments, we tailor our solutions to meet the specific needs of your organisation. We don’t just recommend best practices – we live them. Our team has hands-on experience in hybrid work environments, so we understand the challenges and know how to overcome them.
Get in touch today to see how Engage Squared can help you transform your office spaces with Microsoft Places and empower your teams to thrive in a hybrid world.
About the author
Kate Beaumont is a highly skilled Azure Cloud and Microsoft 365 Consultant with six years of experience in the IT professional services sector.
With a passion for creating solutions with a smart and presentable UI, Kate has strong front-end development capabilities. Kate is continuously working with her clients to solve complex challenges, working out loud and transparently, taking them along on the journey.